
Here's my quick and dirty guide to starting to shoot with off camera flash, in manual exposure mode, and manual flash output settings.
There are a lot of different camera models, flash units and remote triggering options. I shoot with Nikon cameras and flashes. The specifics of how to set the remote options will apply to Nikon stuff, but the manual mode and how to change things and review the images and then make adjustments will apply to any gear.
Goal: Move the flash off camera, trigger it remotely, and set both flash and camera settings manually.
Reason: Letting the camera and flash do all the work will produce decent results. Moving the flash off camera, and adjusting settings manually will produce even better images.
Before I get in to it, here's a sample image. The flash is off camera left, and the settings are all manual. 1/250th, f/6.3, ISO 400, flash output around 1/8th power (I forget exactly). Subject is less than 10 feet away and through glass (at the zoo).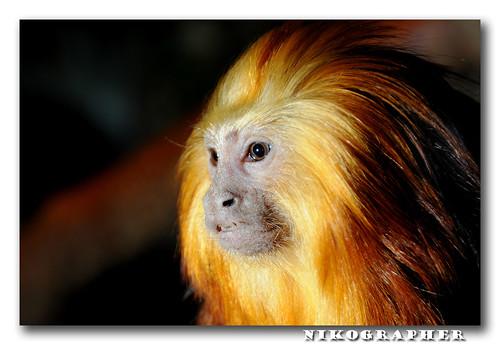
Camera settings
Set camera to manual exposure mode (M). Pick a shutter speed that matches the camera's flash sync speed. Mine is 1/250th. Check your manual if you're not sure of what this value is.
Start with the f/stop wide open, or the lowest numerical value the lens can be set to. This lets in as much light as possible.
Set your ISO to something that is based on the rough amount of ambient light (to start). The above photo was shot indoor, and there was moderate light, by no means a lot of it. I picked ISO 400.
Next, set your camera's flash to Commander Mode. On Nikon this is under the shooting settings in the section for Flash and Bracketing. Select built in flash settings, and choose Commander Mode. In this menu (depending on which camera you have) you can set the output of the built in flash, and the mode and output setting of the remote flash. Set the on camera flash (top setting) to (off) by toggling the mode until it goes blank. On the next entry down, set the mode to Manual (other options are TTL, Aperture Priority, etc), and choose a value for flash output. I pick something to begin from based on existing light and distance to the subject. For close subject (inside of 10 feet) you will probably want a setting between 1/8th and 1/32nd. Note, the SB-800 is very powerful, and can shoot to a distance beyond 100feet. So, inside of 10 feet it makes sense to crank the power way down.
Lower end Nikon cameras are defaulted to channel 3 and group A for triggering remote flashes, and you can't change it. Higher end ones like the D200 or D300, D2x, etc, you can choose from 4 channels and 2 or 3 groups.
Ok, so the camera should be all set: Manual mode, manual flash and f/stop, Commander mode on the built in flash unit and an output of about Manual 1/8th power for something close, and you've set the channel to 3 and group to A (if those last settings are present).
Next, set the flash unit for Remote Mode. To do this, power on the flash, and then hold down the select button which is the center part of the left/right and up/down control. After a few seconds a new menu appears. Navigate to the Remote value, and press the select/center button for a second. Then navigate down to Remote, and hit the select/center button again. Then hit the power button for a second (this gets you out of the configuration menu). Now the flash is ready to have the channel and group values set. Use the up/down and left/right buttons to pick each value and change it to 3A.
Ok, so everything should be set to start and take a test shot and verify that the remote flash is being triggered.
If that's working, continue on, otherwise go back and check the camera's built in flash settings (Commander mode) and the remote flashes setting (Remote).
The way I often shoot with a setup like this is to put the remote flash on a tripod, or put it on a monopod and hold that in my left hand. Pick something to shoot, and place the flash about 5 or 8 feet to your left (assuming you're right handed).
Flash Head adjustments With the stofen diffuser cap on the zoom head is wide open. Without the cap on, you can set the zoom head by hitting the left and right buttons as long as you're not actively in the Channel or Group value areas. How you set the zoom head depends on what you're going for. To send a wide beam of light keep the number low, maybe 24mm. To send a sharper/narrow beam set it to as high as 105mm. You might need to lower the flash output if it is zoomed to 105mm, and increase the power if you have it wide open or with the cap on.
Now take a test photo or two, make sure the remote flash gets triggered, and check the camera's screen for how well it was lit.
Here are some of the next things you can work on to adjust the exposure.
Boost ambient light - To increase the strength of the ambient light on the exposure you can increase the ISO. The raises the overall sensitity of the camera. You can also decrease the shutter speed. Changing to 1/125th will double the amount of ambient light hitting the sensor.
Decrease the flash power - you can obviously lower the power setting on the flash (via the camera's Commander setting). Shutter speed won't affect the flash since it is open for longer than it takes the flash to fire. Increasing the f/stop will lower the overall amount of light hitting the sensor (both flash and ambient).
Increase the flash power - again, changing the flash itself to be at 1/4 power will raise the light from the flash. But you can also increase the ISO, or lower the f/stop number.
Once you get the hang of the initial settings, and then how to make some adjustments, you will be surprised at the images you can produce.
------------
If all that commander/remote stuff is too complicated to start with, try this: Get a TTL cable, like the SC-29 for Nikon. This lets you move the flash off camera, but the camera still does all the work and uses pre-flashes in TTL mode to determine a flash output. Try shooting in Shutter Priority at sync speed (1/250th), and let the camera adjust the f/stop and flash output.
------------
I often shoot in a mixture of both approaches. I will have one SB-800 on a TTL cable set to Commander Mode, and let it output around 1/16th power. Then with a second remote flash in Remote mode, I'll set it to 1/16th power also. Then I might have a stofen cap one flash (often the Commander one to improve the odds of the remote triggering working), and maybe a zoomed head on the second (remote mode) flash, or a diffuser like the better bounce card (a piece of foam that wraps around the flash head to soften the light, but keep it somewhat directional still).
Here are a few more sample shots.
For this one I used a small tripod with two flashes on it, and triggered them both from the on camera flash:
setup shot
result image
And here's a setup I used for taking frog photos in my brother's pond up in Maine. I had two flashes, each on a tripod and triggered them remotely with the on camera flash. It was basically pitch black out, and entirely lit by the two flashes:
setup shot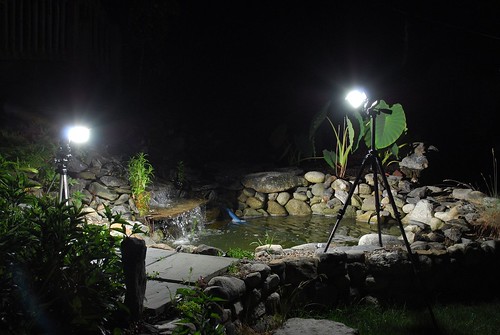
result image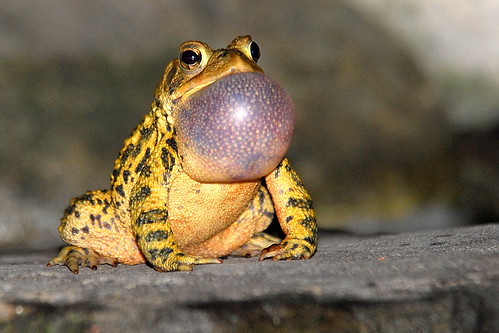
Here are a few other things to keep in mind when shooting like this.
The flashes need some form of line of sight to the flash doing the triggering. This can be bounced or direct flash. The sensor on the SB-800 is on the right side, and you can adjust the direction this sensor points in (make it point towards the camera, or something the camera can bounce its flash off of) and then swivel the flash head to point where you want it.
In remote mode, the flash can't go to sleep. It has to be ready to shoot at all times. When a flash is on camera or on via a TTL cable, the camera can notify the flash to sleep or wakeup automatically. As a result, remote flashes will tend to burn through batteries faster than normal.
The more flashes you use, the less output each needs to make, and the overall faster cycle times you can get.
Mix things up. Once you have figured out the remote flash deal, don't feel you have to do it that way 100% of the time. I will often just use a TTL cable and still shoot in Aperture priority, and TTL flash (with some plus or minus flash compensation). Or I will use two remote flashes, one set to manual 1/16th and head zoomed out and pointing where I want some strong light, but then maybe the second flash is in TTL mode at -1 ev to provide some fill light across a scene.
Good luck and get out shooting! If you have a cat, experiment on them ;)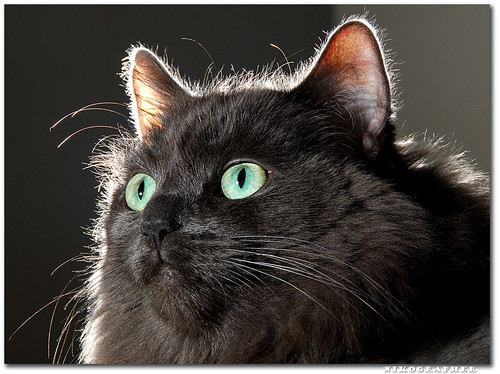
(one flash off camera left for the face, and another behind the cat for some rim light.)
-Jon
![]()
Monday, May 12, 2008
Off camera flash basics (Strobist)
Subscribe to:
Post Comments (Atom)


0 comments:
Post a Comment